
A little over two years ago, I had the absolute privilege of meeting Janice Cox. I was honored that she reached out to Penn Herb Company and wanted to stop by the Flagship store in Northern Liberties. For those of you who are not familiar with her, she is an amazing expert on making cosmetic products from readily available home and garden ingredients.

Most of her recipes are so simple that you likely already have the ingredients in your kitchen pantry. It was so much fun to hear her stories of making natural beauty products! I, of course, asked her for some advice, and then embarked on my own journey of making a few of my favorite natural beauty products at home. It is 2020, of course, and we are all doing more things at home!
How To Make Bath Bombs
I LOVE bath bombs, the glittery ones, the flowery ones, the colorful ones, you name it, COUNT ME IN! #obsessed So, a few years ago tried to make them…epic fail!!! The first time I did it, I didn’t realize that adding water would make it look like a messy volcano! I told Janice what happened this Fall day as we walked around the herb shop, and she told me to try adding a few drops of some natural oil instead of water, it would help keep your skin soft, and add the moisture needed to keep the shape of the bomb. Voila’…next time me and the kiddos tried this fun family project, there were no more crazy eruptions of Mt. Vesuvius, but rather perfectly shaped and beautifully made bath bombs!
Her basic bath bomb recipe works wonderfully, and the best part is that you can customize it however you want. I love using rose petals, lavender buds, and eucalyptus leaves. Bath bombs can easily be colored with natural products such as matcha powder for a green color, or beet powder for a maroon hue. Truly, the combination of herbs, flowers, essential oils, and natural colors is endless; let your imagination (or your kids) be your guide!

After perfecting this, you will never want to buy a store-bought bath bomb again. They are super simple to make and creating your own natural, colorful masterpiece is So. Much. Fun. I highly recommend Janice’s’ book, Natural Beauty For All Seasons, it will teach you the tricks you too have been missing out on, leading you to a whole new world of natural beauty products that can be made at home. The book is set up with some terrific gift-giving ideas for all seasons and I love making homemade gifts any time of the year.
One of my favorite bath bomb combos this year was using rose petals and matcha powder. I loved the color contrast in the actual bomb (bright pink and green), and once the flower petals were floating in the water, it felt like I was transported to a fancy spa in Switzerland. My second favorite bath bomb this year was a gingerbread bath bomb that smells amazing in the wintertime and makes you feel like you’re in Hansel and Gretel’s fairytale. It’s super simple to make and of course, makes a unique gift… here’s how.
Gingerbread Bath Bombs
- 1 cup baking soda
- 1 cup citric acid powder
- ½ cup cornstarch
- ¼ cup Epsom Salt
- ¼ cup raw sugar
- 3 tablespoons almond oil or coconut oil
- 3 tablespoons cinnamon powder
- 1 tablespoon ginger powder
- 1 teaspoon clove powder
- 1 whole anise star per Bath Bomb (optional)
Directions
In a large bowl, mix together the dry ingredients. Add melted oil to the dry ingredients and mix well (use hands) until it is the consistency of wet sand, you may need more oil.
I use a plastic ball mold that is in two halves (it seems to the work best) and greasing the inside of the mold with some extra oil helps get the bath bomb out even easier.
Prior to placing the mixture in the mold, place one whole anise star in the mold so that it will look pretty on the end of the bath bomb. Use a spoon to pack as much mixture into the mold as you can fit, place the two halves together. Unmold and let the bomb sit overnight until hardened. Makes about 6 bath bombs.


Easy Bath Salts Recipe
Bath salts make an elegant soak for sore, tired muscles. The primary base used for bath salts is Epsom salt. Epsom salt can help you look and feel good all over by relieving achy muscles, soothing sore and tired feet, and gently exfoliating skin. They are a great relaxing bath additive to melt away daily stresses. Adding a bit of baking soda to the salts prevents them from clumping together.
Again, like the bath bombs, you can add flowers, dried citrus rinds, essential oils, and even herbal powders for coloring. Himalayan sea salt can also add a beautiful pink color and a larger, rock-like texture to your bath salt concoction. My kids and I had a great time making our own bath salt creations with various herbal products. We arranged a variety of powders for colors, including matcha and beet, on our table in small dishes. Then, we had some orange peel, lemon peel, rose petals, lavender buds, anise stars, butterfly pea flowers, and Himalayan sea salt in separate dishes.
Lastly, we had a few essential oils to choose from, including peppermint, rose, lavender, and eucalyptus. We had a terrific time making our own salty bath-time creations. There is really no way to mess this one up…even when a seven-year-old is in charge! #forgiving We ended up with beautiful bath salt mixtures anyone would be proud to display next to their own tub, or gift to a dear friend. I had the most fun making a peppermint swirl bath salt. It reminded me of my childhood days when things were simpler, and layering different colors of sand in vessels at the boardwalk was my only priority. Directions to make your own swirling container of bath time fun is as follows:
Peppermint Swirl Bath Salts

- 4 cups Epsom Salt
- 2 teaspoons baking soda
- 1 teaspoon beet powder
- 1 teaspoon matcha powder
- 2 glass containers with lids
- Peppermint essential oil or Olbas Oil
Directions
1. Mix Epsom salt, baking soda, and 5 sprinkles of peppermint essential oil together in a large bowl. Divide the salts into equal amounts in two additional bowls. You will now have three bowls of white Epsom salts.
2. Stir the beet powder into one bowl and the matcha powder into the other. You now have three bowls of equal amounts of different colors (one red mixture, one green mixture, and one white mixture).
3. Grab your clear glass jars and start layering! You can get super creative with the patterns of red, green, and white by either layering the three together in one glass container or doing white/red in one and white/green in another. Have fun and layer away!
Homemade Hand Cream
Of all the #DIY beauty projects I have done this year, this was by far one of the most involved. It was interesting to see how a few simple ingredients could turn into a useful beauty product, but the process was time-consuming and complicated compared to making bath bombs and bath salts! #notkidfriendly
For this natural beauty product, I used local beeswax, almond oil, herbal tea, and baking soda. Not so complicated, right? Wrong! I mean, I’m not one to complain about working for a great end result, but this one took time, effort, and a mess… followed by extensive cleanup!

- First, you must melt the beeswax. I used a huge chunk from Fruitwood Orchards, so I had to cut it up into smaller pieces prior to melting it. I learned beeswax is hard…and hard to cut. Touché to the bees!
- Once I had it sliced into smaller pieces, I set up a double-boiling system to melt it down, stirring constantly.
- Next, I boiled one cup of water and added 1/4 cup of butterfly pea flowers to make one cup of tea. Lastly, I had 1 cup of almond oil ready to go and ¾ of a cup of baking soda.
Now for the fun part. You need an emulsion blender, well, I suppose you don’t NEED one, a regular blender would be fine as well…just make sure it’s not the same one you plan on using for Pina Coladas in the Summer of 2021. It gets sticky, not to mention messy, from the beeswax. I truly cannot promise it will ever return to the one you once loved to use to make your favorite homemade soup. FYI- mine still isn’t right after hot water dishwasher rinses or vigorous hand cleaning.

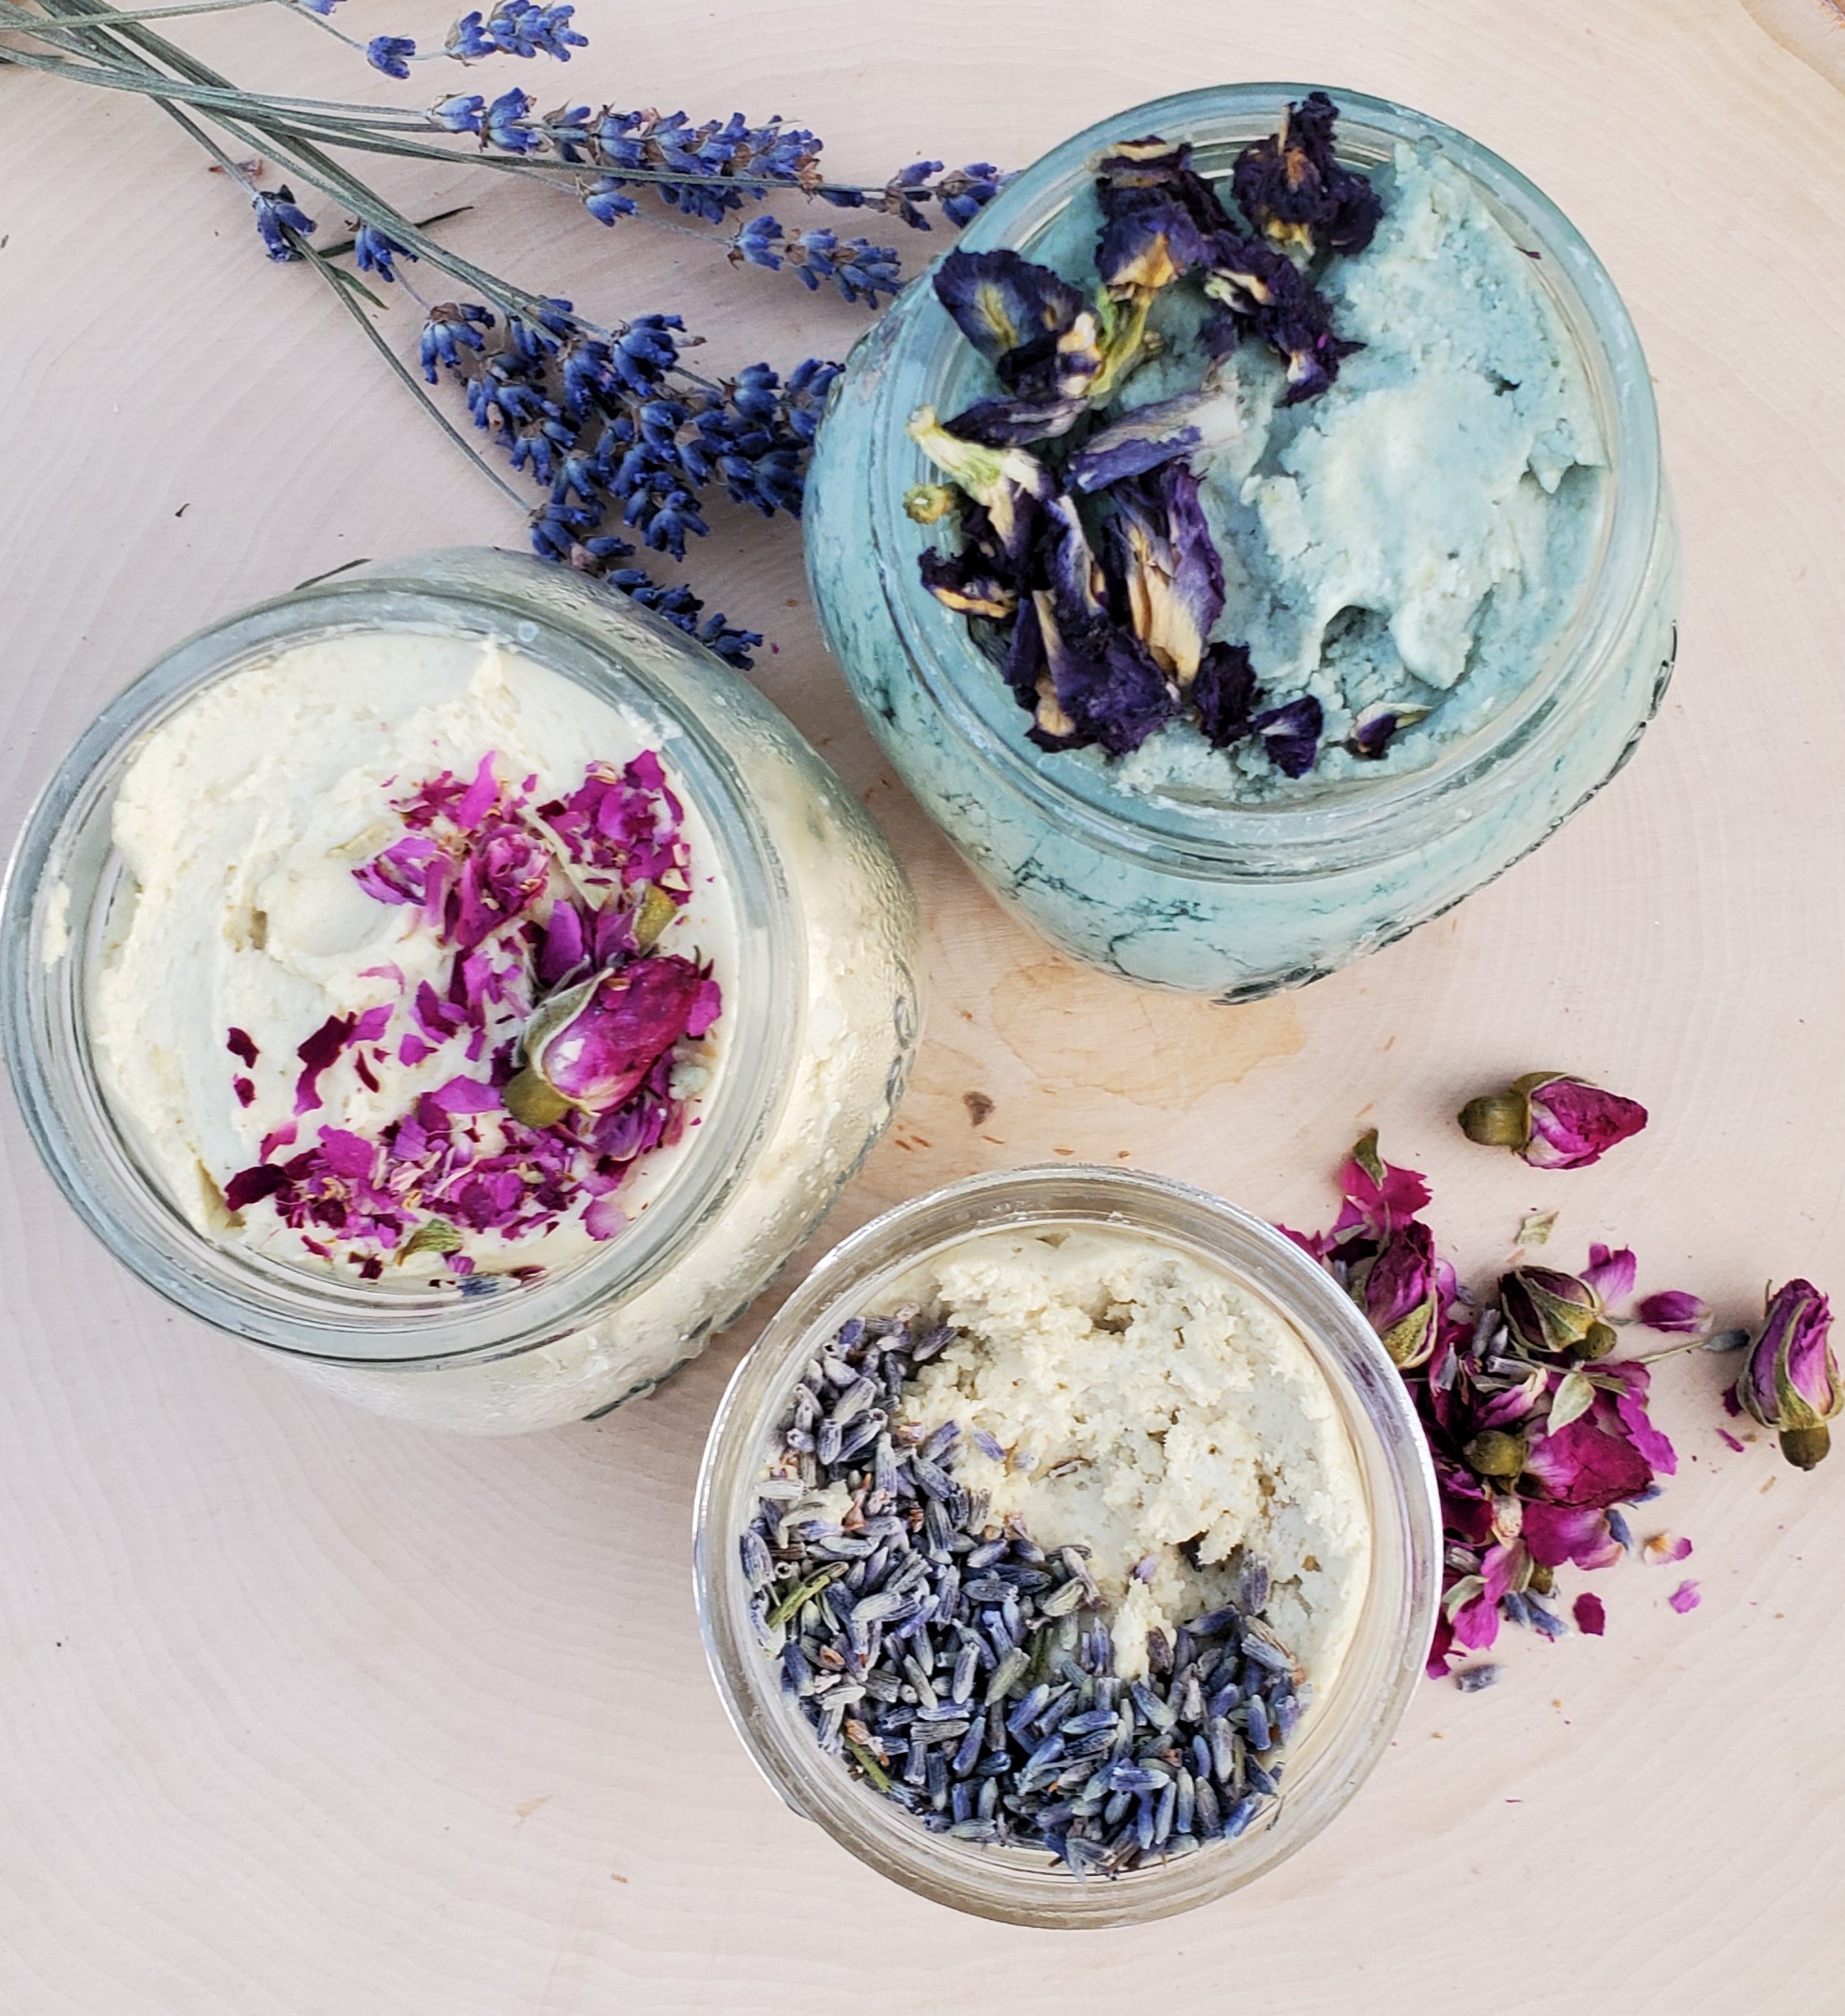
Okay…back to the fun part. Now, get a large metal bowl and pour the oil, tea, melted beeswax, and baking soda all in, and attack it with the emulsion blender. Magically, it whips into this fluffy beautiful hand cream within seconds! I blended mine for about a minute and ended up with a wonderfully creamy lotion. If you want, you can add essential oils for a specific smell. I placed the cream into cute mason jars, a sprinkle of flowers on the top, and they were ready to be gifted to hard-working hands around the block.
The recipe follows, but just a word of caution…it is involved, from the melting of wax to the cleanup of bowls, pots, and a blender. Don’t tell me I didn’t forewarn you! However, in the end, you will be amazed at the beautiful finished natural product… it’s worth it.
Butterfly Pea Flower Hand Cream
- 1 cup melted beeswax
- 1 cup almond oil, coconut oil, or jojoba oil
- 1 cup butterfly pea tea
(1 cup boiling water and ¼ cup flowers, let sit 10 minutes and strain) - ¾ cup baking soda
- Your choice of dried flowers for decoration on lotion (optional)
- Your choice of essential oils (optional)
Directions
Blend melted beeswax, oil, strained tea, and baking soda for 1-3minutes with an emulsion blender. If you prefer to have a scent to your lotion, you may add a few sprinkles of your essential oil of choice to the tea prior to blending. You will know the lotion is finished when it looks whipped and all the ingredients come together. Transfer to containers, sprinkle with dried flowers (optional), and use daily. May be stored for up to one month.
All the above products make wonderful gifts for your friends who have also had an unprecedented 2020 and managed to make the most of being at home. I enjoyed making cute tags out of scrapbook paper and twine, it adds to the specialness of the homemade gift. Names like “Romance Bath Salts”, “Sunny Day Bath Bombs”, “Lazy Lavender Bath Bombs”, and “Working Hard Hand Cream” accompanied some of the natural beauty products I gifted. As always, I would love to hear about what natural beauty products you are making at home, whether messy and complicated or easy and sophisticated!


What a beautiful way to relieve stress in a troubled world! As a recipent of some of these products, they make you feel loved and pampered. Nothing more soothing on a cold, damp winter day than a fragrant soak in a warm soothing bath. And fun for the kiddies, too. Working together to make gifts for loved ones is a caring activity, and they enjoy the baths too!
Thank you so much for your wonderful comments. You are truly loved and appreciated. ❤